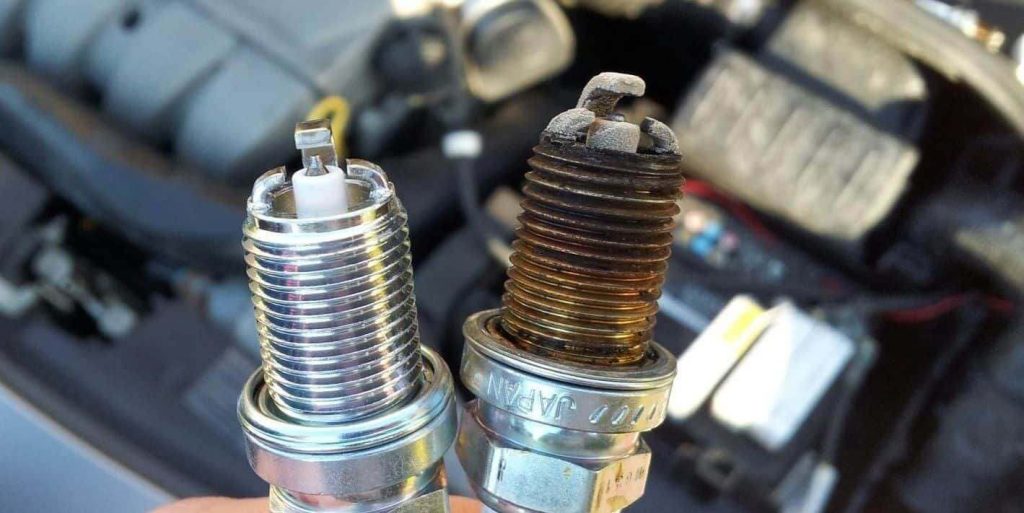
Spark plugs, those unsung heroes of the internal combustion engine, perform a vital task: igniting the air-fuel mixture within the engine cylinder. But these little champions can also act as silent storytellers, revealing valuable clues about the health of your engine. By learning how to read spark plugs, you gain a valuable window into what’s going on inside your car.
Understanding Spark Plug Anatomy
Before we delve into deciphering the whispers of your spark plugs, let’s get acquainted with their basic anatomy. A spark plug is a threaded metal tube with a central electrode insulated from the outer shell by a ceramic insulator. The tip of the central electrode faces a gap across from a side electrode on the outer shell. This gap is precisely calibrated to allow a high-voltage spark to jump, igniting the fuel mixture.

The Art of Spark Plug Reading: A Visual Guide
Now, onto the exciting part – interpreting the condition of your spark plugs! Grab your toolbox and a reference guide (often provided by the spark plug manufacturer) – we’re going on a diagnostic adventure.
The Ideal Scenario: A Light Tan or Grayish-Brown Color
Congratulations! If your spark plug’s insulator nose (the tip) exhibits a light tan or grayish-brown color, it’s a sign of optimal health. This coloration indicates proper heat range, efficient combustion, and a happy engine.
Rich Running: Sooty and Black Spark Plugs
Encountered black, sooty deposits on your spark plugs? This suggests a rich running condition, where the air-fuel mixture is overloaded with fuel. Causes could be a faulty fuel injector, clogged air filter, or malfunctioning pressure regulator. Rich running can lead to decreased performance, increased fuel consumption, and even fouled spark plugs (meaning the deposits prevent proper spark).
Lean Running: Whitish or Ashen Spark Plugs
On the flip side, a whitish or ashen coloring on the spark plug insulator signifies a lean running condition, where there’s insufficient fuel in the air-fuel mixture. This can stem from a vacuum leak, clogged fuel injector, or incorrect spark plug heat range. Lean running can lead to engine overheating, power loss, and potential damage to engine components.
Oil Fouling: Wet and Oily Deposits
If your spark plugs are adorned with wet, oily deposits, it suggests oil fouling. This can occur due to worn piston rings, valve guide seals, or excessive oil consumption. Oil fouling reduces the spark plug’s ability to ignite the fuel mixture effectively, leading to rough idling and misfiring.
Overheating: Melted Electrodes and Blistered Insulators
Spark plugs exposed to extreme temperatures may exhibit signs of overheating, such as melted electrodes, a glazed or whitish insulator, or even metallic deposits. Causes include incorrect spark plug heat range, lean running condition, or engine cooling system issues. Overheating can lead to pre-ignition (fuel igniting prematurely) and engine damage.

Beyond the Basics: Additional Spark Plug Insights
While color is a primary indicator, a closer inspection reveals further details:
- Deposits on the Insulator: Excessive deposits on the insulator can impede spark propagation.
- Gap Size: The gap between the electrodes is crucial for proper spark. An incorrect gap can affect engine performance.
- Electrode Condition: Look for signs of excessive wear, corrosion, or damage to the electrodes.

Taking Action Based on Your Spark Plug Findings
Once you’ve interpreted the condition of your spark plugs, it’s time to take action. Here’s a general roadmap:
- Normal Spark Plugs: If your spark plugs appear healthy, consider replacing them according to the manufacturer’s recommended service interval.
- Abnormal Spark Plugs: For abnormal conditions, identify the underlying cause based on the spark plug’s appearance. Consult a mechanic for diagnosis and repair, and replace the spark plugs as needed.
Remember: Spark plug reading is a valuable diagnostic tool, but it’s often just one piece of the puzzle. If you encounter abnormal spark plug conditions, a qualified mechanic can help pinpoint the root cause and ensure your engine runs smoothly.

Maintenance and Troubleshooting Tips
Whether it’s your car, computer, or household appliances, regular maintenance and effective troubleshooting are key to keeping things functioning smoothly and preventing costly breakdowns. Here are some general tips to help you become a master of both:
Maintenance:
- Consult the manual: Every machine has an owner’s manual, and it’s your best friend when it comes to maintenance. Refer to it for recommended service intervals, cleaning procedures, and proper operation instructions.
- Schedule regular checkups: Just like you wouldn’t wait for a toothache to see a dentist, don’t wait for problems to arise before performing maintenance. Schedule regular cleaning, lubrication, and part replacements as recommended by the manufacturer.
- Keep it clean: Dirt, dust, and debris can wreak havoc on machinery. Develop a cleaning routine for your equipment, paying attention to air filters, vents, and areas prone to grime buildup.
- Inspect regularly: Take some time to visually inspect your equipment for signs of wear and tear, leaks, or loose parts. Addressing small issues early on can prevent them from escalating into bigger problems.
- Invest in preventative maintenance: While it might seem cheaper to ignore minor issues, neglecting preventative maintenance can lead to expensive repairs down the road. Taking care of your equipment now will save you money and frustration in the long run.
Troubleshooting:
- Identify the problem: The first step is clearly defining the issue you’re facing. Be as specific as possible – Is there a strange noise? Has performance decreased? The more details you have, the easier it will be to diagnose the problem.
- Gather information: Consult the owner’s manual or search online resources for troubleshooting guides specific to your equipment. This can provide valuable insights and potential solutions.
- Start simple: Before diving into complex repairs, try the easy fixes first. Is it unplugged? Does it need a restart? Often, the solution is a simple one.
- Isolate the cause: If the simple fixes don’t work, try to isolate the cause of the problem. Can you narrow it down to a specific component? This will help you focus your troubleshooting efforts.
- Seek help if needed: Don’t be afraid to ask for assistance! There are a wealth of online resources, forums, and professional repair services available. Knowing your limitations and seeking help when needed can save you time and frustration.
By following these maintenance and troubleshooting tips, you can extend the lifespan of your equipment, avoid costly repairs, and keep things running smoothly!


